Monday, 1 September 2014

1884 corset - Construction

The two previous corsets I have made so far have both been single layer corsets with boning channels pre-bought and made from coutil respectively. And I have got to tell you that I loathe sewing them to the inside of the corset. So for this project I had decided to make a double layer corset. I had read about the so called welt/folded seam- method and was very keen on trying it since it seemed to be quite forgiving when it comes to fluctuations in the width of the seam allowances. However, I could not quite figure out how to combine this technique with the bust gores that are supposed to be inserted into seams. The issue kept me awake for a few nights. In the end, after cutting out the pieces, I decided to sew the first three panels of both the outer and lining layer together separately and apply the double layer method as described by Linda Sparks in her Basics of Corset Building. Once the panels were sewn together I inserted the busk, aligned the shell and lining layers and then put in the bust gussets (one layer only).

Seam allowances pinned down, gore outline traced. Ready for insertion.

Bust gore top stitched into place 

The first three panels joined separately, aligned on top of each other (not a perfect match I have to say) and boning channels stiched.
Once that was out of the way the following panels were added to the corset using the welt seam method and this worked like a charm. Fast, easy and neat. Before I knew it the sewing part was over and it was time for eyelets. and boning

All assembled!
Though, before cutting boning I put the corset on to adjust the top and bottom edges
Edges trimmed and outlined.
For boning I mostly used spiral steels and placed them according to the original pattern. Flat steels were used in the back. The edges were then bound with self-made bias binding and every single bone was then flossed top and bottom. My fingers really hurt after that! 

Flossing 13 bones per half top and bottom = 52 triangles

I knew that the flossing around the top edge would be covered by the lace so I did not spent as much time on that. For the same reason the binding is sewn down by machine here while it is hand sewn along the bottom.
After that the only thing left was to add some embellishment in the form of black lace along the top edge.

Boned, bound, flossed and the lace pinned on.
Proper photos of the finished piece will have to wait until the next post though!

1884 corset - Pattern alteration and mock-ups

I now I have not shared a lot of the progress with the 1884 corset here, but boy has it been a journey! In terms of corsetry I definately consider myself a beginner and this was to be my third corset ever. My corset-career started of with a pre-bought kit for with a simplicity pattern and after that I went on the the truly victorian s-curve corset. This time I have to say that I really stepped up my game by choosing av pattern from a contemporary fashion magazine (links to website and pattern here).


Dealing with the pattern alterations was difficult, but I daresay I learned a lot. The pieces for all of the patterns in the magazine are fitted onto only two pages and my pattern can be found on the sheet below.


Quite a jumble right? So the first thing I did was to outline the pieces I needed.


Somewhat more orderly. For the first mock-up I simply enlarged this pattern to fit a busk I already had lying around, cut it out in a cheaper fabric and put it together. The result? Waay too big, no waist reduction (barely an hourglass shape) and no support for the bust. The bust gores started just above my natural waist.


 After this failure I put the project on hold for a very long time and did not take it up again until I signed up for foundations revealed and read an article about scaling patterns with photoshop. Being a proper nerd I thus set out to learn photoshop.

Using this method was awesome because it gave me the possibility of cleaning up the pattern pieces and aligning them on the computer without fearing that the scaling got fucked up (I am talking to you MS Word). So, after the first go with photoshop I had something that looked like this:


I then scaled the pattern to approximately fit my hips. I also cut it horizontally and increased the distance between the waist and underbust to compensate for my extremely long torso. At this point I started to suspect that the pattern was intended for someone with a body type vastly different from mine. Before doing a new mock-up from the pattern I reduced the waist measurement, mainly around the third panel from the left.


Mock-up no. 2


The fit was greatly improved with this mock-up and I started to feel enthusiastic about the project again. There were still some issues though. The mock-up closed in the back so it would have to be further scaled down. There were also still issues with the bust gores, they started too far down and were too wide which meant that they still offered no support whatsoever.

Moving on to mock-up no.3 I went back to photoshop, simply marked the whole pattern and reduced it to 95% of its size. I then even further increased the distance between the waist and underbust to get the gores to sit right. Once the pieces were printed out I again reduced the waist by hand.

Mock-up no.3


This time I was very happy with the fit. The gap in the back was acceptable, I liked the shape it gave me, it fitted smoothly over the hips and it supported the bust okay. After this I felt ready to move on the the real fabric with just minor alterations, like raising the underbust another inch and making the front gore a bit smaller.

That was all for this post, next one will be about the construction of the real corset!

Thursday, 19 June 2014

A circular skirt

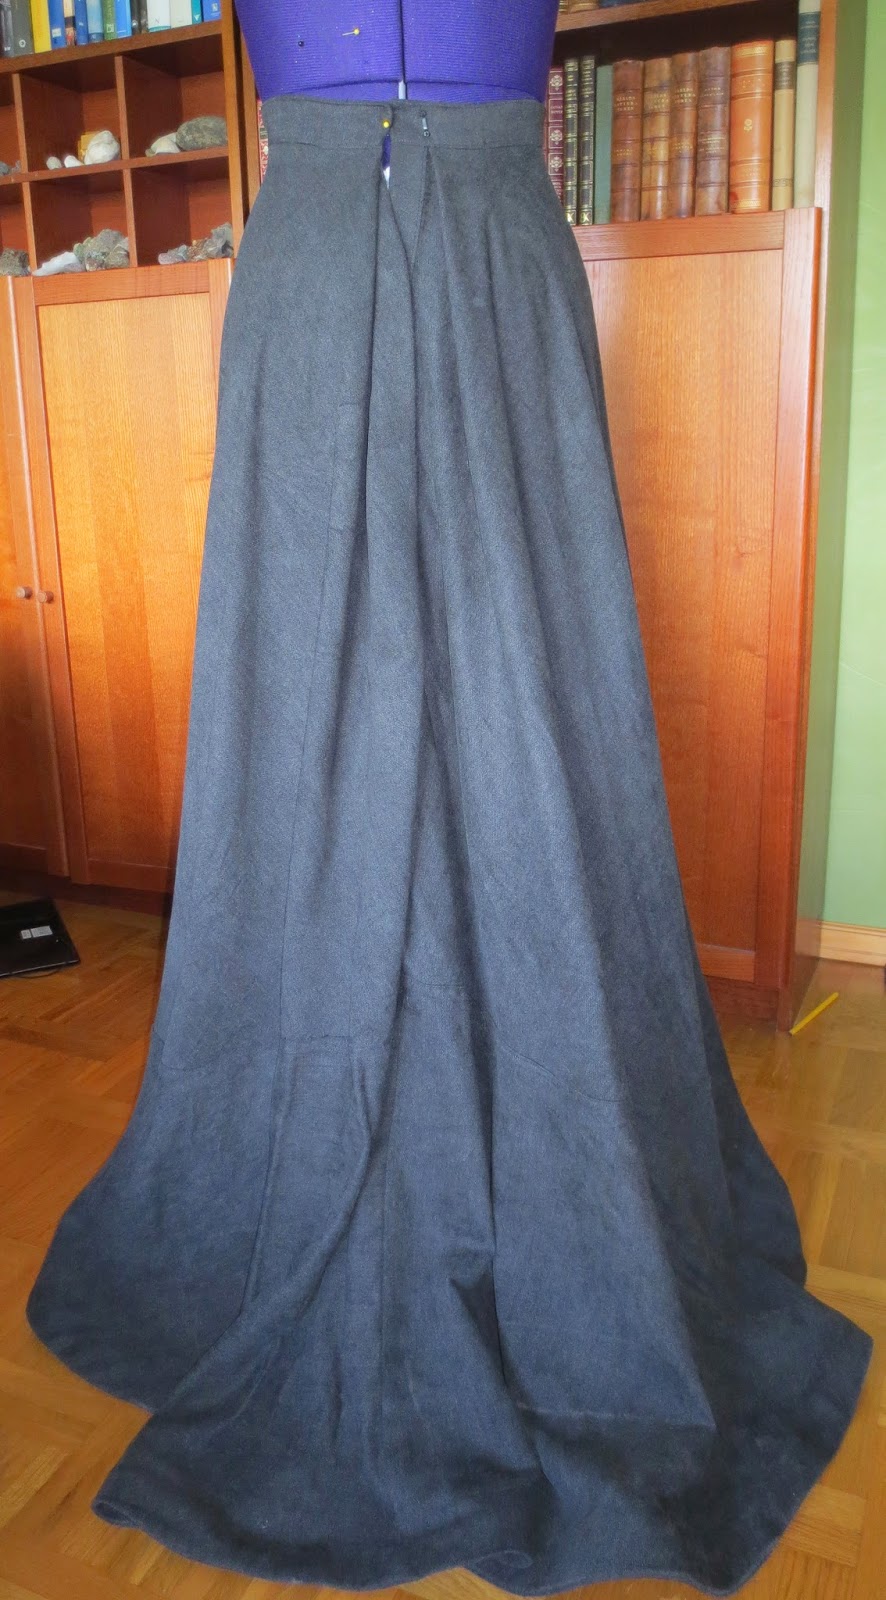
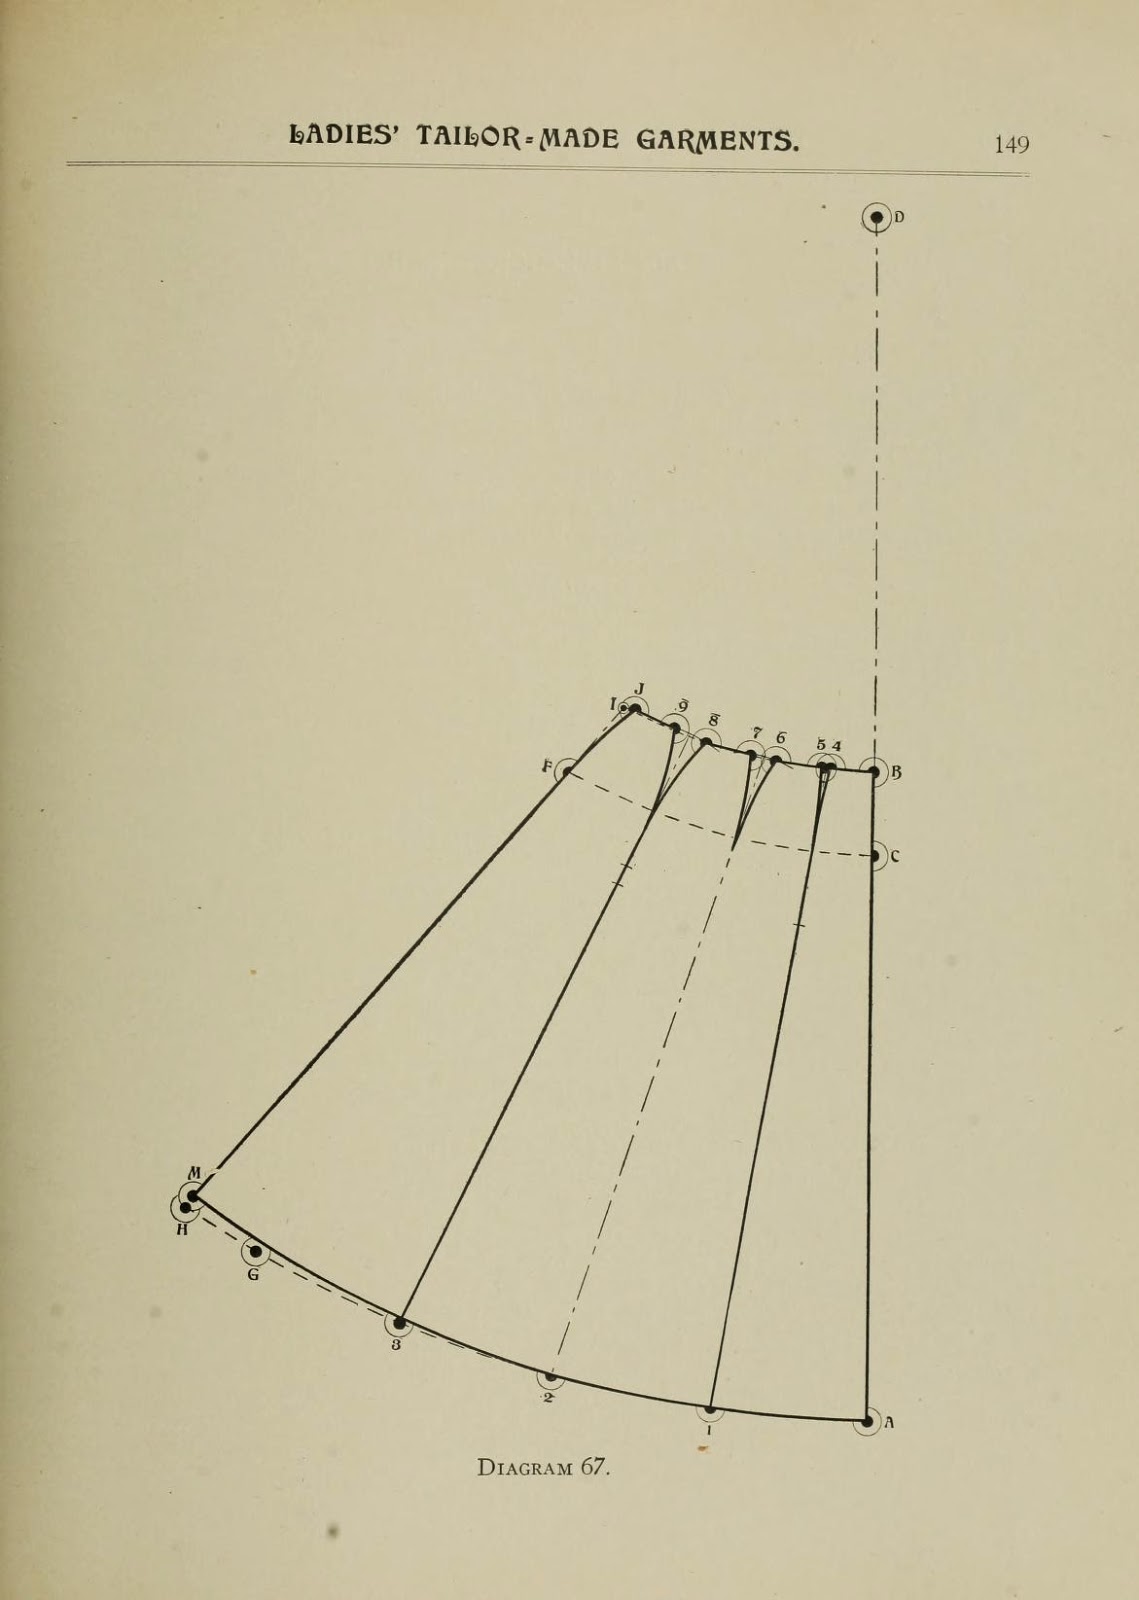
Once you make a petticoat you better make something to wear with it. I have for long been planning to make a circular skirt with a flounce to my Edwardian ensemble, but of course no did not start on it until the day before the event where I wanted to wear it. Again I turned to the patternmaking book form 1908 to draft the pattern and followed the measurements given to make it as easy as possible. The only change I made from the basic pattern was to add about 10 cm at the center back to make a pleat there.

Pattern diagram
The fabric was from my stash, a grey cotton fabric that looks like a mixture between wool and velvet. Kind of weird, but nice. To keep the pieces from stretching I used my machine and sewed a seam around them all. The fabric does not seem to fray to any great extent so when I sewed the center front and back seams I left the seam allowances raw and pressed them open. Different views of the finished skirt can be seen below. The pattern made for a pretty long skirt so it has a bit of a train. Not very practical, but oh so fabulous.

Side
Front
Back
Before attaching the flounce to the upper part of the skirt I made the placket and the belt. There is quite a lot of fabric in the flounce so it was easier to not have that being in the way. For the placket I once again used the instructions from Cloak & Corset, but this time made the placket in two separate parts. Since the opening is concealed in the pleat I only used one hook and eye and one button halfway down. To strengthen both the placket and the belt they were faced with fusible interfacing. In order to fit the skirt to the waistband two darts were needed in the front.

Skirt placket at center back

Placket concealed in pleat
The flounce was sewn on wrong sides together with the skirt. One of the seam allowances were then folded over and stitched down, making a flat felled seam. The join is barely visible as it is but I might add some kind of decoration in the future that covers it.
Seam joining flounce and skirt
Example of skirt decoration, from here
The hemline is faced with horeshair braid (nylon) to help it keep its shape. Since the bottom edge is very curved I did not simply fold it up, but attached a strip of fabric cut on bias and turned it to the wrong side of the skirt. It was then secured on the inside using the machine to make a blind hem. I would have made it by hand but my body does not care for so much hand sewing.

Finally, a picture of the skirt being worn:


Wednesday, 11 June 2014

1900s Petticoat

We will start of by looking at the first piece I made to go with the 1903 corset, the petticoat. This was the first petticoat I have ever made and it involved a bit of improvisation, but I am overall pleased with the result. My main inspiration was the Edwardian petticoat from Past Patterns:
Past Patterns Edwardian petticoat
Sadly, I did not buy the pattern since it would require shipping from the US to Sweden. Instead I went to a pattern making book published in 1908 that is readily accessible online and that I have been dying to try out. Perhaps I made an over complicated petticoat when I choose to use the pattern for a five-gored skirt that is fitted over the hips. From what I have understood, the patternpieces for an underskirt is often just squares that perhaps taper towards the waist. Anyway, the five-gore pattern is the one that I used and I did not alter the measurements from the books since they appeared to be quite close to my own.
Pattern diagram and description
After I drafted the pattern I cut it about knee-high and tried to add some width to create the flounce. In retrospect, even more width was needed.

I used a plain, cheap cotton fabric from Ikea for the whole petticoat. Construction was pretty straight forward and it is mostly machine finished. The side seams were all french seams, the placket was made in a single strip and I made an ordinary belt. I had never made a placket before, so the eBooklet on plackets from Cloak and Corset was very helpful. The finished petticoat, somewhat dirty after having been dragged across wet grass in the botanical garden, is seen below.
Front
Side
Back
Placket and a few pleats made to fit the skirt to the belt
 For decoration I covered the seam joining the flounce and the body of the skirt with lace beading and inserted a satin ribbon matching the corset.

Lace beading

A bit further down there is a lace insertion for which I followed a tutorial from Wearing History. I also added some 1cm wide tucks for decoration and to reduce the length.

Lace insertion and tucks
I dithered for quite some time on how to finish the bottom edge of the petticoat and just two days before the picnic decided to add a row of gathered lace with a dust ruffle underneath. There was however no suitable lace to be found in the stash so I just put on the dust ruffle and covered the seam with some bias binding laid flat on top of the seam allowances.

Dust ruffle
The dust ruffle is made from the same cotton fabric. I cut loads of 10cm/4 inch wide strips that were hemmed on one side. I used a presser foot that makes the hem automatically, that device is really the best thing ever! The other side was pleated using the automatic ruffler extension to my sewing machine before being sewn to the bottom of the petticoat. At the moment I am not sure if I should look for a suitable lace to put on top of i at all, I rather like the look of it.

Last but not least, a picture of it being worn over the corset!


Tuesday, 10 June 2014

Coming up!

It has been a while to say the least. Nothing much has happened in the corseting area, except browsing pictures on the internet and drooling of course.

But the last couple of weeks has actually left some room for sewing and I was in desperate need of completing my Edwardian wardrobe for a picnic that took place this last weekend, a delightful event that me and my sambo have attended one time before. The picnic is held in Gothenburgs botanical garden on the 6th of June every year. The theme is the turn of the century, but everything victorian, edwardian, steampunk or even modern is welcome. It is mostly about eating cake and playing croquet anyway. For most of the day the rain was pouring but we had a nice time anyway.


For the next couple of days I will attempt to dismantle my outfit and write about the pieces I have made myself, mainly the skirt, petticoat and hat. The shirtwaist is a find from Ebay that might be antique, but I am not positive about it. The whole ensemble is composed around my TVE01 corset that i have written about previously. 

Stay tuned!

Monday, 2 December 2013

Red corsets

A Victorian corset has long been planned but since I am taking the hard path it isn't always prioritized. However, after picking up and finishing Sarah Chrismans book "Victorian Secrets: What a Corset Taught Me about the Past, the Present, and Myself" inspiration was renewed.

I have long since decided that my intended corset would be burgundy, simply because I love that colour. The coutil is dyed but I had some concerns about whether the colour would be historically accurate or not. An internet search alleviated my fears though. For the time period I am aiming for, colourful corsets were not unheard of.


So, no longer any doubts about the propriety of a red corset. Additionally I now have a lot of inspiration for embellishment. 

Tuesday, 15 October 2013

Planning for yet another corset

The edwardian corset just finished was my second corset ever and the improvement from the first one is substantial. Next on my list is a victorian corset to go under a future bustle dress. Since the victorian corset has the silhouette that most modern ones are based on it probably wouldn't be too hard to find a finished pattern to use. But why make it simple? A challenge is always fun and historical accuracy is something we aim for. So why not use an original pattern?

I went to this website with original pages from an old fashion magazine from the Netherlands. In 1884 they included the pattern to a corset I would very much like to recreate:


I like the overall look of it, and especially the gores. It would be interesting to see if it is physically possible for me to reduce my waist (my previous corsets suggest otherwise) and for that I have understood that space for the bust and the hips is essential.


I found the pattern and went ahead to make a small paper mock up. Here it is seen from the side and I must say that I am absolutely digging the curves. The pieces suggest that there is seam allowance added to them. It is not easy to make sense of it all when the instructions are to small to read and in dutch. So to scale it up will prove difficult.


This is the fabric that will be used. It is the same herringbone coutil as in the edwardian corset but dyed burgundy. I have no idea if this colour is historically accurate, but lately I have had a thing for it.

There are a lot of questions when dealing with this corset. How much seam allowance is added? How will I scale it up, are all the bones marked on the pattern, will I make single or double layer? As soon as my exams are over with I am going to find out.